These days starting your own online store doesn’t have to be just a dream. Thanks to WordPress anyone can build an online store with WooCommerce. It’s quick, fairly easy and you can set up a professional looking website to sell your products without spending a ton of money. What’s more, with these simple WooCommerce tips you don’t even need to hire a designer to make your store awesome.
In this post you will get quick and simple tips for WooCommerce that you can use today. To make a long story short, we are going to tell you how to improve your WooCommerce store. Are you ready to see the easy WooCommerce tips we have for you? Let’s begin!
Tip #1: Consider the Navigation of Your WooCommerce Store
At the outset, we recommend you flatten the navigation of your website. What does this mean and why is it so important? A flat website architecture shortens the number of clicks a customer will need to perform to reach their desired destination, and it’s a pretty popular model. Just visit popular online stores such as ASOS or West Elm to see what we mean – they clearly display links to their most popular pages plus any new or highly relevant content (like sales, or limited edition products).
With the help of this flattened, condensed menu structure the number of clicks between the homepage and the deepest layer (or customer destination page) is greatly reduced. As a result, a visitor of your online shop will find the needed page easily. What is more, this navigation model is a great way to improve your SEO since it makes your site easier for search engine bots to crawl as well.
To illustrate how everything works, let’s imagine the next situation. For example, your customer needs to perform 10 clicks before finding a particular page. That’s a lot of click and will likely take quite some time. A visitor may give up and leave your site to find a more convenient alternative. On the other hand, bots from Google (and other well-known search engines) spend only a limited time on your pages. Undeniably you will want them to view out as many of your pages as possible, and preferably your best ones (the ones you really want to rank for). Both customers and bots will be able to open the needed pages in a few clicks thanks to flat architecture. You can look at the Woostroid theme designed by TemplateMonster as an example.
The main theme demo clearly displays an easy to navigate menu, as well as featured sections for new products and popular pages (such as Shoes by Zara, Jackets and a free shipping promotion). Notice how a visitor can open the most popular sections in a single click.
Tip #2: Make Products Discoverable with Categories and Subcategories
When it comes to WooCommerce tips this is such a simple but effective one. You will be shocked! One of the most common mistakes people make when designing a WooCommerce store it that they forget to add categories and subcategories. When a customer visits your store it is very likely they’ll want to sort items during their search and categories provide a quick way for them to do that. In addition, you can use the subcategories to further narrow results.
So, why do you need category pages? The first big reason is for SEO. The more specific pages you have with long tail key words the more likely it is that new customers will discover you in search engines like Google or Bing. So while having a “Dresses” category is great, adding subcategories for “Little Black Dresses” and “Coachella Ready Festival Dresses” gives you even better odds of ranking.
The second reason is for your customers. For example, let’s say you have a WooCommerce store that sells books. Needless to say sometimes people just do not know what they want. Sometimes a visitor will open your “Novels” category and see the most popular products. However, they will have to scroll through all of your pages if you don’t have categories and subcategories to help them browse your inventory.
As you can see in the Shopkeeper WordPress theme demo above, using subcategories and including them in an easy to read megamenu is a great way to ensure customers and bots peruse your store. So don’t forget about relevant keywords, and use then to your advantage when creating your categories (note: if your theme doesn’t include mega menu support you can add them with the Ubermenu plugin).
Tip #3: Add Live Search to WooCommerce
In an effort to make it easy for your customers to find exactly what they want we also recommend using Live Search. With it, prospects will be able to view out the most popular and relevant search results of your eCommerce site in real time speeding up the online shopping process.
You can also add this features to any site using the WooCommerce Product Search extension, or by choosing a theme that already includes this feature like the ShoppyStore theme. If you go to their demo you can give it a try. Typing just a few letters into the search-box will auto-display matching store results. The more you type the more narrowed the results become.
Tip #4: Create Your Own Unique Product Descriptions
What is more, you need to create a truly unique content without copy-pasting. In the end, duplicate content is another common mistake users do while building their WooCommerce stores.
It’s very easy to just copy and paste content from one product page to another. There are even plugins that link your WooCommerce store to your Amazon Associates account to automate the process. As tempting as this can be make your best to avoid it. You’ll find your pages will stand a much better chance of snagging a top search ranking if you write your own unique descriptions.
Similarly, you can make sure your product pages stand out even more if you add in custom images or media. If you use something like the free YITH WooCommerce Featured Video plugin you can even add custom videos to your product gallery. Just film your own video, upload it to YouTube or Vimeo and add it to your product page using the plugin’s options.
Tip #5: Remember to Improve Content Internal Linking
Internal linking has always been a must-have for any winning online business. The idea is that visitors to your site read one blog article and click the links to other related posts. But today we are talking about WooCommerce sites specifically, and this is another common mistake of eCommerce website owners. Which is a shame since it’s super easy to added internal links in your store!
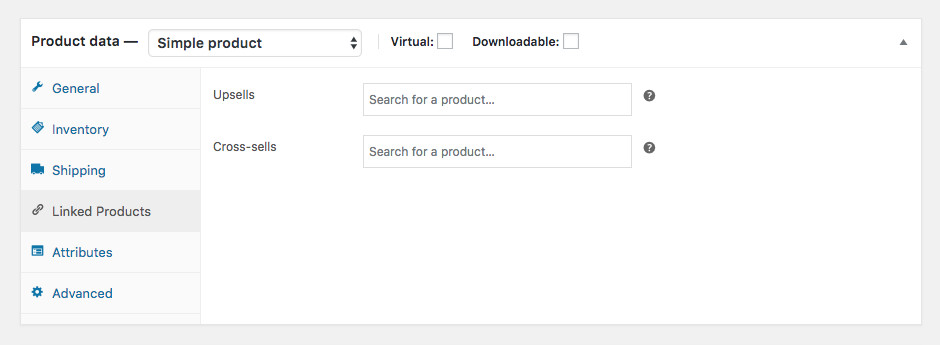
WooCommerce includes built-in options to add Upsells and Cross-sells to your products. Upsells will be recommended on the product page as a related product as something the customer may also like (example: on a red dress you may want to upsell a more expensive red dress). Cross-sells are displayed on the cart page as complementary products (example: if a customer added a bathing suit to their cart they may also want to add sunglasses).
In addition some WordPress themes include fully styled product pages that help you showoff your store products. The Noir WordPress theme is a great example. The theme will automatically display related products from the same category. Plus you can add WooCommerce widgets to your sidebar to display top rated items that your customers may also be interested in.
You can even take it one step further and add a WooCommerce price compare plugin. This must-have function will help visitors compare several products by the main features. This means there will be more chances that the guest of your WooCommerce store will buy something (or multiple somethings).
Other than helping to increase your conversions by enticing customers to view multiple pages, internal linking is also good for SEO. Using internal linking, you can lead search engine bots to find more pages crawling deeper into the WooCommerce site you built. Just don’t forget to update the content of your WooCommerce store if you add any links manually. Statistics show that there are almost 40% sites that have problems with broken links, which is commonly caused by removing linked products.
Tip #6: Ensure Your Reviews are Real
We’ve covered more than half our WooCommerce tips, but this one is a very important one. Today social proof is a huge factor as to whether or not a customer purchases a specific item, and one of the most powerful forms of social proof is reviews. Preferably many positive ones. But when a potential customer sees obviously fake reviews on a product it can be off putting. Surely you’ve seen products with questionable reviews? That are just to perfectly worded (or the opposite – confusingly broken) to be true?
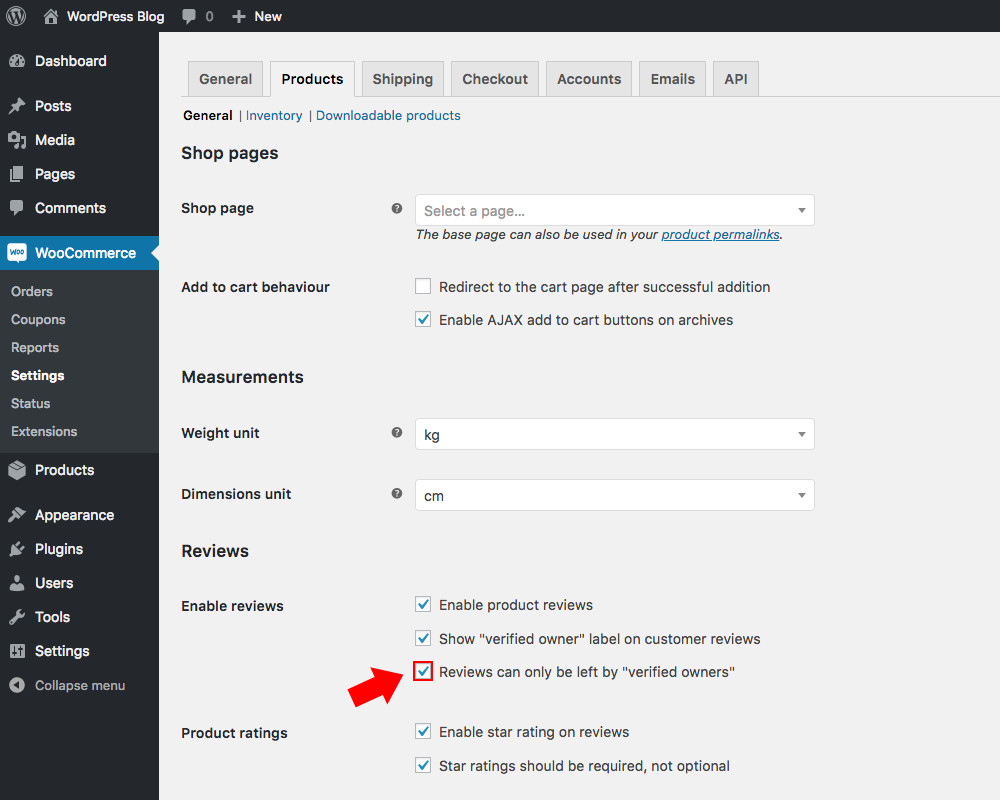
Make sure users can trust the reviews published on your store by verifying reviews. One easy way to do this is to check the box under WooCommerce > Settings > Products so that only actual “verified owners” who purchased the product from your store and registered for an account can leave a review. Or you can install a plugin like TrustedSite Reviews so that a third party can request and vet reviews. This way you not only collect authentic, real reviews but you’ll have a lot of them.
Tip #7: What About Out-of-stock Pages?
Needless to say, every eCommerce site will run to the fortunate problem of products that run out of stock. If it’s only for a few days then it’s likely not a big problem, but what if you know it will be months until you can restock? In a similar situation you may want to remove goods you do not want to sell anymore. These reasons may be different but in the end you have the same question. What should you do with the product pages for out-of-stock or removed items? Logically, you want to delete them. you don’t want to disappoint your shoppers, but don’t be hasty! There’s another option.
You should know that deleting out-of-stock products reduces the number of ranking pages on your website. This means you are reducing the visibility of your WooCommerce store as well. Moreover, what if one day the item becomes available again?
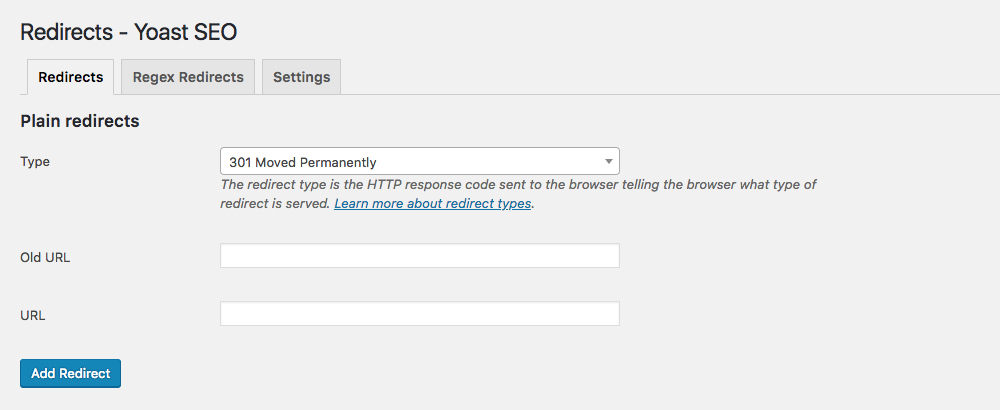
Instead we recommend you redirect the page of out-of-stock product to different but similar one. As a result, you will both offer your goods and keep the opportunity to re-activate the old page if needed. The easiest way we’ve found to redirect pages is with an SEO plugin. If you’re using Yoast SEO this option is available from your WordPress dashboard under SEO > Redirects. If you think the product is gone for good you should use a permanent 301 redirect, but if you think it’s just a matter of a few days or weeks a temporary 307 redirect might be better.
Tip#8: Speed Up Your WooCommerce Store
Surely, you did a great work to set up your eCommerce site. Still, you need it to work as fast as possible for a lot of reasons. Firstly, it makes your SEO better. Search engines like Google take page load times into consideration. It’s more likely for a page that loads in a second or two to rank higher than a page that takes thirty. Secondly, today even a 5-seconds delay will make your customers want to leave and it’s a top contributor to an increased bounce rate.
To speed up your website first test your page speed in Google’s PageSpeed Insights or with another free tool. This will show you the load time for the page you entered as well as provide several suggestions to speed it up.
Next follow the suggestions! It’s possible you simply need to optimize images. Many store owners make the mistake of uploading huge, high quality images. While these look great they take ages to load, especially for mobile users. Instead choose a reasonable image size, make it a JPEG and run it though an image optimizer. Then use a CDN to help your content load faster.
Tip #9: Add Helpful Features with Plugins
While we recommend you choose a top-notch responsive WooCommerce theme to begin with, we know it may not be possible to find a perfect fit. But don’t worry – there’s an easy solution to have your dream WooCommerce store.
First choose a theme that looks similar to how you want your store to. Preferably a theme with built-in styling options. For example, the New York theme includes full WooCommerce support plus it comes with front-end point and click styling options (thanks to the included Yellow Pencil CSS editor). This way you can easily tweak fonts and colors without having to learn any coding languages.
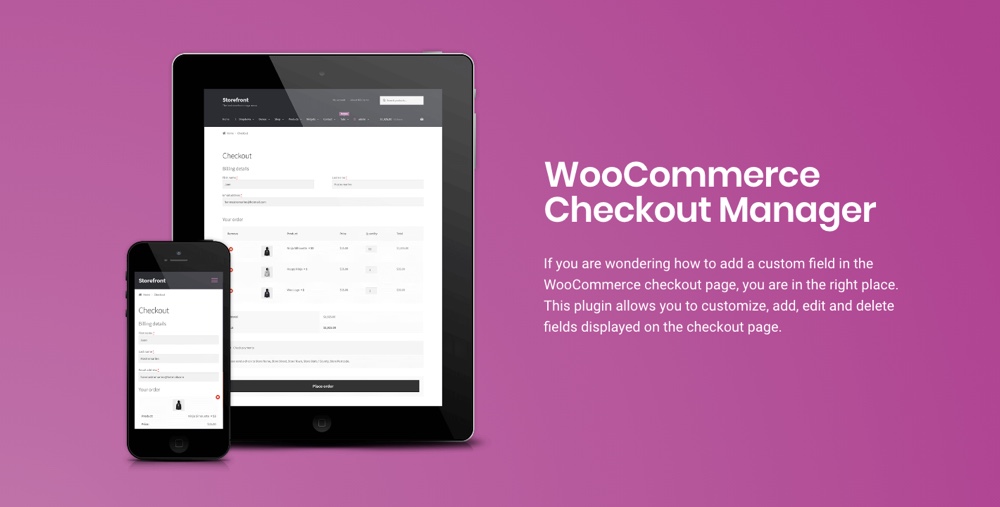
For example, you might want to add more options to your checkout page. In this case a specific plugin like the WooCommerce Checkout Manager is a great choice. With this plugin installed you can customize your checkout page by removing or adding custom fields. The plugin also allows you to add custom fees (based on percentages, single fields or even multi-checkboxes), conditional fields, file uploads, and email notifications.
But that’s just one specific example. No matter what your needs, chances are there’s a plugin for the features you want. Add memberships, discounts, referrals, infinite scrolling and more. Just don’t go crazy and install too many plugins – often times you can find one plugin with multiple features you want, and the less plugins you have the less chances there are for a conflict (but that’s just our advice).
Any Other WooCommerce Tips?
These were all WooCommerce tips that are sure to help you to create a marvelous WooCommerce store. As you can see, they’re not too complicated and you can certainly handle them even without website building experience. So get going and make your eCommerce site better today!


