Looking to switch from Wix to WordPress?
Wix is a popular website builder that lets you create a simple website, fast. However, many Wix users soon realize that their options are limited and adding extra features can become quite expensive.
If you want more features and flexibility without the high costs, then switching to self-hosted WordPress is the best choice. WordPress powers over 32% of all websites on the internet because it’s extremely powerful. In this article, we will show you how to properly move from Wix to WordPress and grow your website with complete freedom.
After reviewing various different ways to move from Wix to WordPress, we believe the easiest method is by importing your blog posts via RSS.
In this step by step guide, we will walk you through the process of transferring your Wix website to WordPress. Depending on how many pages you have on your Wix site, the migration can take upto an hour.
Here are the steps to migrate from Wix to WordPress:
- Sign up for WordPress web hosting
- Setup your new WordPress site
- Customize your site’s style and appearance
- Import your blog posts via RSS
- Convert your Wix pages to WordPress
- Create your main navigational menu
- Redirect Wix to WordPress
Ready to switch from Wix to WordPress? Let’s get started.
Step 1: Signup for WordPress Web Hosting
To start a WordPress blog, the first thing you’ll need is a web hosting account for your website.
Web hosting is your website’s home on the internet. This is where all of your files and data is stored.
You will also need a domain name (such as www.yoursite.com). This is your website’s address on the internet.
When you use Wix, they host your website for you which is also the reason why it’s quite limited. On the other hand, WordPress is a free software, so you’ll need a place to install it. That’s why you need to purchase web hosting and a domain name.
Step 2: Setup Your New WordPress Site
After purchasing your new hosting plan, you’ll need to install and setup WordPress.
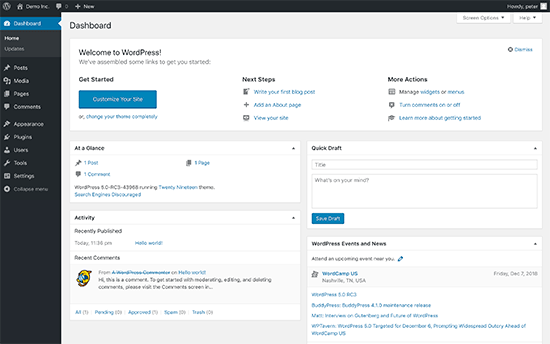
If you signed up with ASPHostPortal, then they automatically install WordPress for you, and you can simply login to your WordPress dashboard from your hosting account.
Upon login, you will see your WordPress admin dashboard:
All other WordPress hosting companies also offer 1-click WordPress installers from their hosting dashboard.
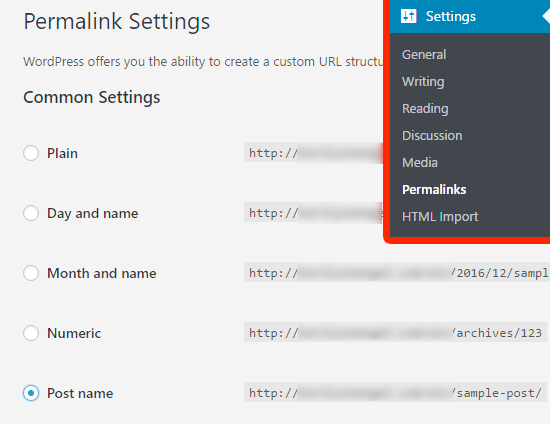
Once you login to WordPress admin area, it’s a good idea to set your WordPress permalinks.
Your permalink settings will determine the address of each blog post. For example, instead of publishing a blog post to:
www.yourblog.com/2017/10/blog-post-title
You can publish it to:
www.yourblog.com/blog-post-title.
You can change your permalink settings by navigating to Settings » Permalinks in your WordPress dashboard. Once you have selected the structure you want, click on the Save Changes button at the bottom.
Step 3: Customize Your Site’s Design
Next, you should customize the appearance of your website. It’s easy to do that using WordPress themes.
WordPress themes are similar to Wix templates, they control the appearance and display of your WordPress website.
There are thousands of free WordPress themes available for you to use. Some themes are very basic and minimalist, while others will add a lot of new features to your site.
As a WordPress beginner, you may want to start with a simple theme that’s easy to use.
Remember, you can easily change your theme in the future, so it’s important that you don’t spend too much time on this step.
You can even use the default WordPress theme and start with the migration process. Because the most important part is moving all of your content from Wix to WordPress.
Step 4: Import Your Wix Blog Posts to WordPress
In this step, we’ll transfer your Wix blog posts over to your new WordPress site.
Wix is a closed platform, and they don’t provide an easy way for users to migrate their content away from Wix.
But we can still automate the process by importing your Wix RSS feed, instead of recreating each blog post manually.
To get started, you’ll need to download your Wix RSS file.
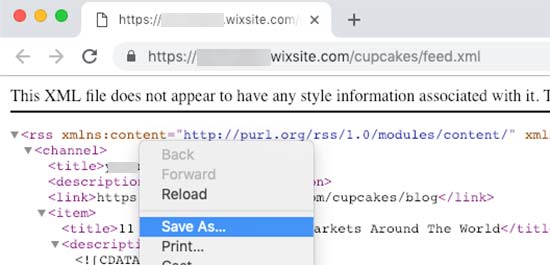
You can locate the file by adding /feed.xml or /blog-feed.xml to your Wix website URL.
If you don’t have a custom domain with Wix, then you can find your RSS feed at username.wixsite.com/blogname/feed.xml or username.wixsite.com/blogname/blog-feed.xml, where “username” is your Wix username and “blogname” is the name of your blog.
If you have a custom domain such as www.yourwixblog.com, then you can find your RSS feed at www.yourwixblog.com/feed.xml or www.yourwixblog.com/blog-feed.xml.
After navigating to the proper URL, you should see a page full of code.
Go ahead and right-click anywhere on the page and click Save As to save the file in your computer.
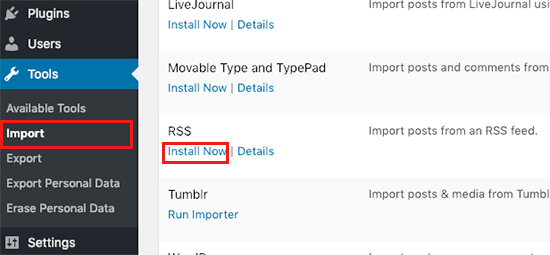
Now that you have your RSS file, you can log in to your WordPress dashboard and click on Tools » Import.
Next, click the Install Now link under the RSS heading.
After a few seconds, you’ll see a link at the top of the page to Run Importer. Go ahead and click the link.
Next, you need to click the Choose File button and select the feed.xml file that saved to your computer. Once selected, you can click the Upload file and import button.
If you have a lot of blog posts to import, then it can take several minutes to import them all.
When it’s done, you’ll see a confirmation message.
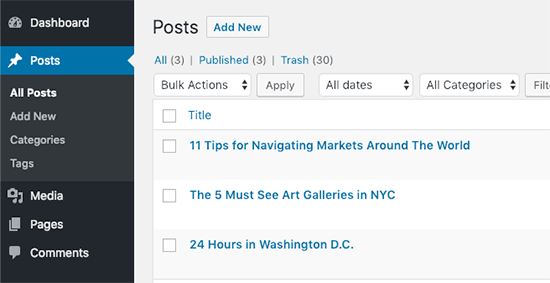
To check on your blog posts and make sure they were exported from Wix correctly, you can navigate to Posts » All Posts and click View underneath each post.
At this point, the content of your blog posts has been transferred, but there’s one problem: any images in your post are still hosted with Wix.
Luckily, there’s an easy way to fix this and move your images over to WordPress.
All you need to do is install and activate the Auto Upload Images plugin.
Plugins are like apps for WordPress that allow you to add new features.
After installing and activating the plugin, you’ll need to re-save each post that contains images, and the plugin will import images inside it.
It would be time-consuming to edit each post one by one, but we have a handy trick that you can use to quickly re-save all WordPress posts at once.
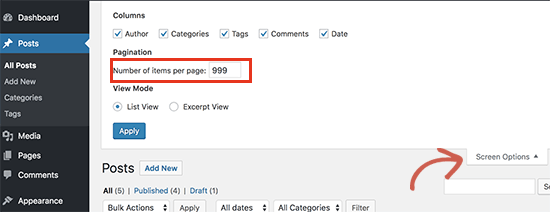
Simply go to Posts » All Posts page and then click on the Screen Options button at the top.
You need to increase the number to 999 in the ‘Number of items per page field’ field and click on the Apply button.
WordPress will reload the page, and this time it will show 999 posts at a time.
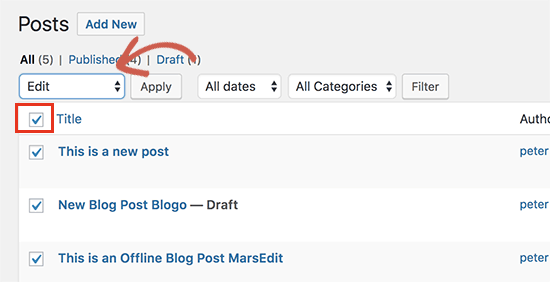
Next, you need to select all your posts and then select Edit under the bulk actions menu.
After that, you need to click the Apply button. WordPress will show you a quick edit box with all selected posts. You just need to click on the Update button, and WordPress will update all your posts.
Step 5: Import Your Wix Pages to WordPress
After you have imported your blog post, next we’ll need to transfer your Wix pages over to your WordPress site.
Wix doesn’t provide any automated way to do this, so we’ll have to recreate each page in WordPress one by one.
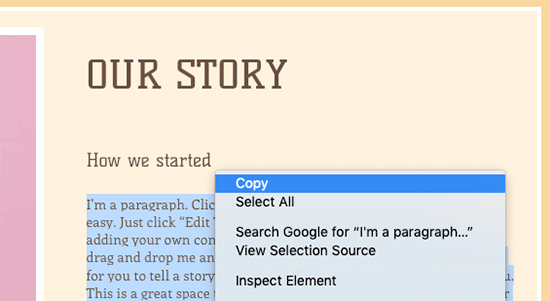
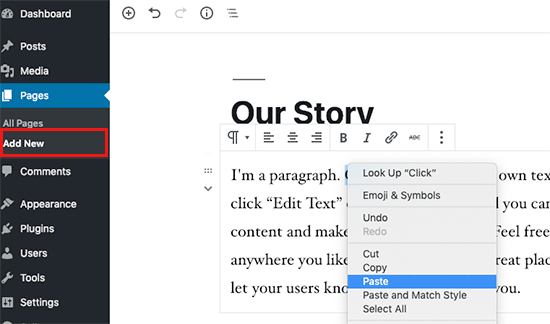
First, you can navigate to the Wix page you want to transfer to WordPress. Highlight all the content (except for the page title). Then you can right click and click on Copy.
After that, you need to login to your WordPress dashboard and navigate to Pages » Add New to recreate the page. At the top of the page, you can type in the page title. Then you can right-click and and click on Paste to recreate the content.
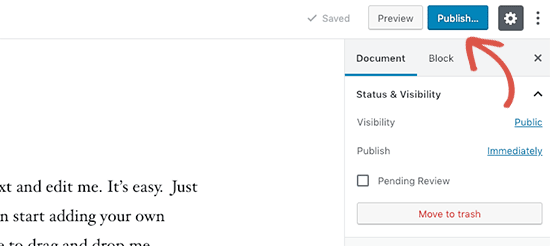
When you’re finished styling your page, you can click the Publish button to publish your page on your new WordPress site.
While you can follow the above method for all text based pages, it won’t work for certain pages like your contact page.
You’ll need to install a contact form plugin like WPForms to create a contact page.
Now that you’ve converted all your content, it’s a good idea to carefully review your posts and pages to make sure everything is working right and looks the way it’s supposed to.
Step 6: Create Your Main Navigational Menu
Next, you’ll want to make sure your visitors can easily navigate through your new website using your primary menu.
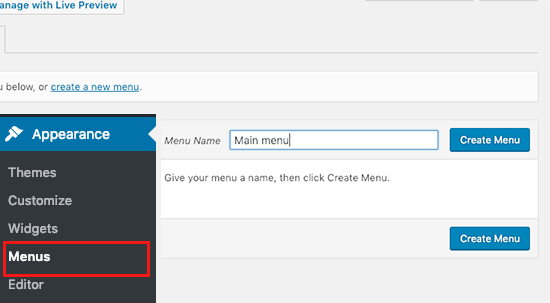
You can create a navigational menu by going to Appearance » Menus. Type in a name for your menu, and click one of the Create Menu buttons.
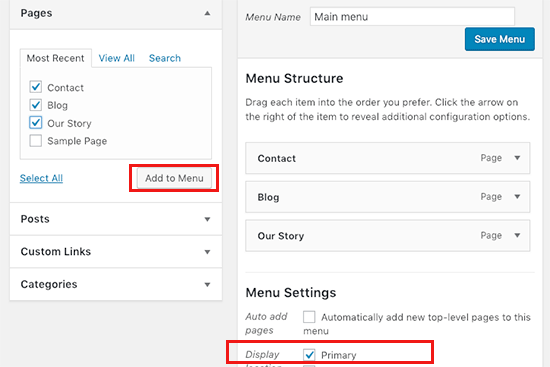
Next, you can select whichever pages you want to add to your main menu, and click the Add to Menu button. When you’ve added all the pages you want, select the menu position.
Finally, click the blue Save Menu button on the right.
Now your menu has been created and is live on your website.
Step 7: Redirect Wix to WordPress
Your new WordPress site is complete, and you’re ready to let your readers know about your move.
It’s important to not only announce your move to your readers but to setup proper redirection.
You want all visitors of your old site to land on exactly the same page on the new site. This will also let search engines know that your old site has moved to a new location.
Note: You can only redirect users to your new WordPress site if you had a custom domain on Wix. Unfortunately, if you were using a wixsite subdomain, then you cannot redirect users to your WordPress site.
First you need to open a plain text editor like Notepad and paste this code:
|
1
2
3
4
5
6
7
8
9
10
11
12
|
var hashesarr = { "#!about-us/c1it7":'/about/',"#!contact/ce54":'/contact/',"#!random-article/c1mz":'/random-article/' };for (var hash in hashesarr) { var patt = new RegExp(hash); if (window.location.hash.match(patt) !== null) { window.location.href = hashesarr[hash]; }} |
In this code we have added three example URLs in the following format:
"#!about-us/c1it7":'/about/',
The first part of the line looks for a string in the URL. This will be the URL your Wix users will be coming from. The second part in the line is the WordPress slug for the same page.
Unfortunately, you will have to manually add each URL in this format. Once you are finished, you need to save this file as redirects.js.
Next, you need to upload this file to your WordPress theme’s /js/ directory using an FTP client.
If your theme does not have a /js/ directory, then you need to create one.
Now you need to edit your theme’s functions.php file and add this code at the bottom of the file:
|
1
2
3
4
|
function wpb_wixjs () { wp_enqueue_script( 'wixredirect', get_stylesheet_directory_uri() . '/js/redirects.js', array(), '1.0.0', true);} add_action('wp_enqueue_scripts', 'wpb_wixjs'); |
Don’t forget to save your changes.
That’s all, you can now try visiting a URL from your old Wix site to see the redirect in action.
Note: These redirects will not redirect search engines and are not very SEO friendly.
Lastly, don’t forget to inform your readers of your new address. You can do this by announcing your move on social media, writing a blog post about it, and sending out a notice to your email newsletter.
Step 8: Add Essential WordPress Plugins
WordPress plugins allow you to add more features to your site. Plugins work like Wix apps. There are hundreds of plugins available, free and paid.
If you’re looking for a Wix style drag & drop page builder, then we recommend using one of these best drag & drop WordPress page builder plugins.
That’s it! We hope this tutorial helped you switch from Wix to WordPress without a lot of hassle.

