WordPress enables you to create a functional and compelling website with no technical knowledge. However, if you want to get the most out of your site, learning a little about coding can go a long way. One of the quickest ways that you can start to make meaningful changes to your site is by learning how to use CSS in WordPress.
Cascading Style Sheets (CSS) is one of the most important languages in web design. Making CSS tweaks to your site lets you customize its appearance, layout, fonts, colors, and more. CSS offers more complete control over the way your site looks than your theme does – and it isn’t that hard to work with.
What CSS is (and how it works)
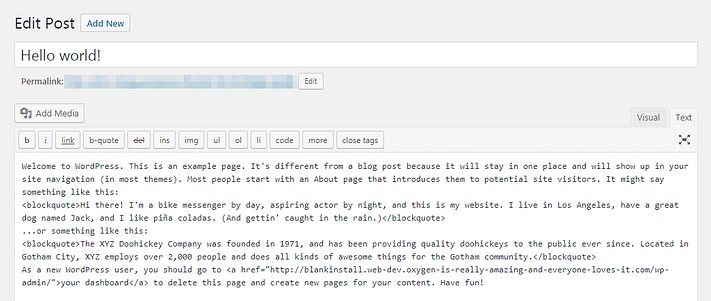
First, let’s back up a little and talk about Hypertext Markup Language (HTML). This is the primary language used to create your WordPress website, and is descriptive in nature. HTML code tells web browsers about the various elements of your content. For example, it indicates which text is part of a header, and which is part of a body paragraph.
If you’ve ever checked out the Text tab in the WordPress editor, you’ll have seen HTML at work:
You can also use HTML to dictate the style of your website’s in some ways. However, this is an unwieldy way to get the job done. For example, if you wanted to make all of your post titles purple, you would need to add HTML code containing the same instruction to every heading individually.
That’s where Cascading Style Sheets (CSS) comes to the rescue. This language is used to dictate how HTML elements appear – including their sizes, layouts, colors, fonts, and so on. For example, you can change the color of all the headings on your site using a few lines of code with CSS, without altering your content’s HTML.
Keeping structure and style separate this way gives you complete control over the appearance of your site and lets you easily make changes whenever you want. It also means that you can start using some basic CSS in WordPress without knowing any HTML (although understanding the basics of HTML does help speed up the process).
Where to add CSS in WordPress
While you can add CSS directly to your WordPress theme’s style sheet, we don’t recommend this method because it’s easy to make mistakes and any changes you make will get overwritten when you update your theme (unless you use a child theme).
Fortunately, there’s an easier solution. To add CSS to WordPress, you just need to:
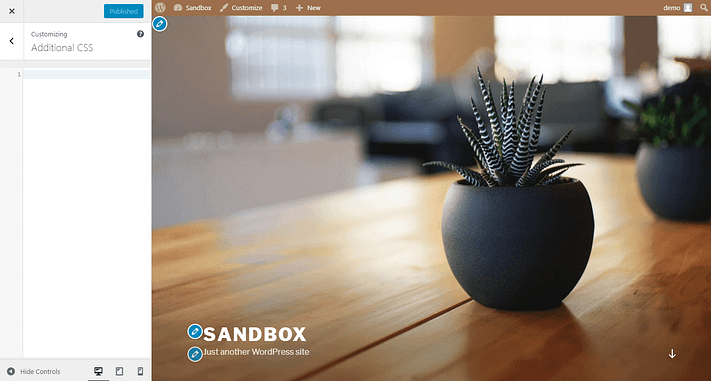
- Navigate to Appearance > Customize in your WordPress dashboard to open the WordPress Customizer
- Select the Additional CSS option from the menu on the left in the WordPress Customizer interface:
The (currently) empty editor in this area enables you to type in lines of CSS code, without having to sort through the existing style sheet. You can add as much CSS here as you want – just include each new snippet on its own line. Plus, you can see your changes take effect in the live preview. That way, you’ll know whether they look right before publishing them to your site.
Additionally, this editor will help you “validate” your CSS, which is a fancy way of saying that it will warn you if you make any obvious mistakes.
If you’re getting curious about what kinds of CSS tweaks you can make here, don’t worry. Stay on this page in your dashboard, and we’ll explore a few ways to start customizing your site’s appearance with CSS.
How to start customizing your WordPress site with CSS
As we mentioned earlier, you can change just about any aspect of your site’s appearance using CSS in WordPress. The sky truly is the limit here. For now, however, we’ll keep things simple, and look at some basic CSS tweaks you can make.
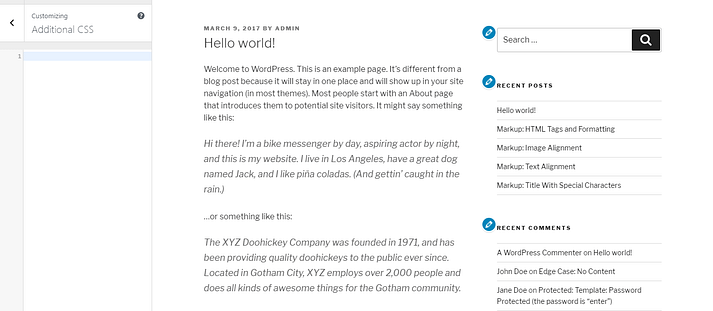
We already mentioned altering text color, so let’s start there. If you really want your WordPress posts to grab your visitors’ attention, you can experiment with changing the color for each post’s title. This is what a basic post looks like in the Twenty Seventeen WordPress theme:
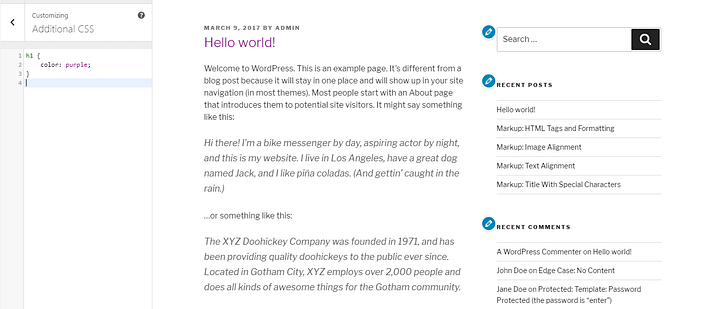
Now, add this code to the Additional CSS box in the Customizer:
h1 {

color: purple;

}
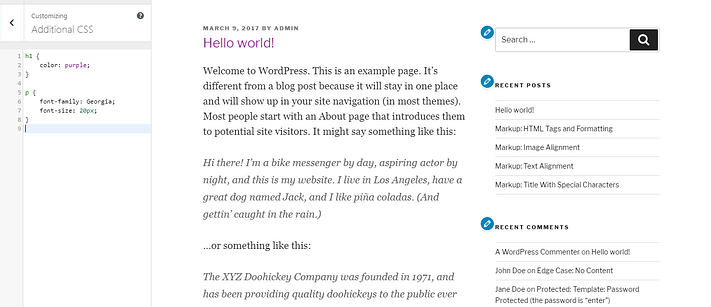
As you can see, the post title’s color has changed from black to purple:
This same tweak will also be applied to every other post on your site. Instead of simply naming a color, you can also use hex codes to get the shade just right. Simply replace purple with #9C33FF (or whatever color you want to use). When you’re happy with the new hue, select Publish at the top of the screen to make your changes live.
Next, what if you want to make some alterations to the body text? Let’s edit its font family and size, by adding this code on a new line:
p {

font-family: Georgia;

font-size: 20px;

}
Again, you can see the results right away in the Customizer:
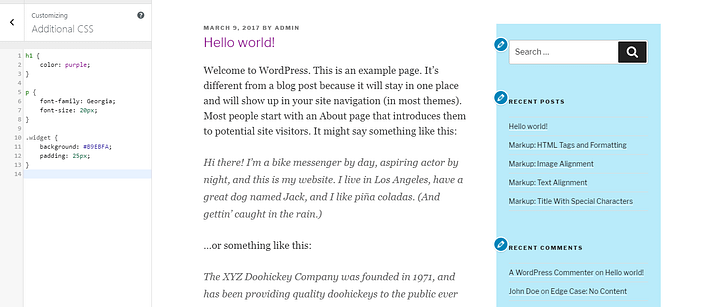
Finally, let’s make the sidebar stand out a little more, by adding a light blue background and a little padding. On a new line, paste in this CSS:
.widget {

background: #B9EBFA;

padding: 25px;

}
This places a simple background behind your sidebar:
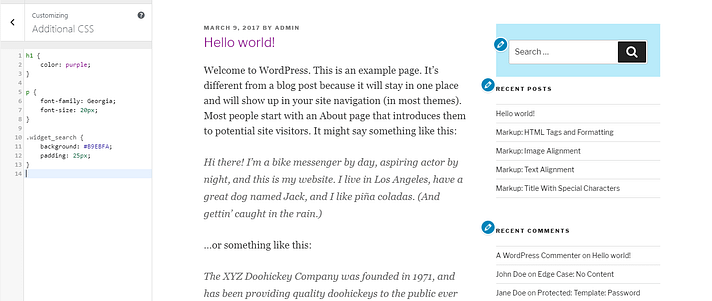
Keep in mind that this code will affect all of your widget areas, including your footer. You can also make changes to specific widgets if you prefer. For example, you could add a background only to the search widget, by replacing .widget in the above code with .widget_search:
At this point, you might be starting to grasp how CSS works under the hood. The first line of a CSS snippet specifies which element you’re altering – such as post titles (h1), text contained in paragraphs (p), or your widget areas (widget). The following lines, enclosed in brackets, contain specific instructions about what should be changed.
Where to learn more about CSS
There are plenty of useful guides online that will help you learn more about CSS and the most common elements you can affect. Until then, if you’re struggling to figure out what code you need to make a particular change, a simple Google search will usually lead you to the answer. Resources like the MDN web docs from Mozilla usually rank highly in Google and do a great job explaining various aspects of CSS.
With a little practice, you’ll find yourself adding CSS with ease in no time.
Conclusion
Working with your website’s code can seem intimidating if you’re a beginner. However, many of the languages your site relies on are surprisingly user friendly when it comes to making basic tweaks. Learning to use CSS in WordPress effectively may take a little time, but it will provide you with an unprecedented level of control over your site’s look and layout.
Instead of making changes directly to your theme’s CSS style sheet, you should use the WordPress Customizer to add in CSS code quickly and safely. This process enables you to tweak the colors, sizes, fonts, and placements of various elements, without permanently affecting your active theme’s core code. What’s more, you’ll be able to see your changes live, so you know exactly what effect they’ll have.

