
This article explains how to deploy an ASP.NET Core application to a Windows hosted IIS Server. Most applications are now deployed to a cloud-hosted solutions like Azure App Services, but sometimes it is required to deploy to an IIS. I ran into a number of issues, which weren’t very well documented, which surprised me a bit, but then who doesn’t deploy to Azure.
At first I tried to setup the recommended web deployment solution, and it just didn’t work. Could not find the correct links, of find the way to configure this. I recommend using a publish to folder and then copy this to the target folder on the deployment server. If you are using VSTS, or Bamboo to automate this later in the CI build, this will work really well.
Then it is really important to match the dotnet run-time version with the version used to build the application. You could fix the APP version in the csproj file. If you use the .NET SDK 2.1.4 to develop, then use the same run-time on the deployment servers. This should be then documented as part of the release process, saves you time if you need to re-deploy this 6 months later.
Configure the website, Host
As a demo software, we would like to deploy 2 applications:
- demo.deployment.com
- stsdemo.deployment.com
The STS is the secure token server, and the demo application is an ASP.NET Core MVC application which uses the STS to login. The STS uses a simple Microsoft SQL Server database.
Define the website names, and create the certs for the website domain names. You could use a self signed cert, but if deploying for use on the internet, then you must use a proper cert!
If deploying on an internal network, try using a sub domain of a proper cert. Avoid using the self signed cert if possible.
The IIS website needs to be configured and setup. Like in the Microsoft documentation, create the website, and switch the application pool. Configure for HTTPS.
Create the self signed certs for development.
Using powershell:
New-SelfSignedCertificate -DnsName "demo.deployment.com", "demo.deployment.com" -CertStoreLocation "cert:\LocalMachine\My"

New-SelfSignedCertificate -DnsName "stsdemo.deployment.com", "stsdemo.deployment.com" -CertStoreLocation "cert:\LocalMachine\My"
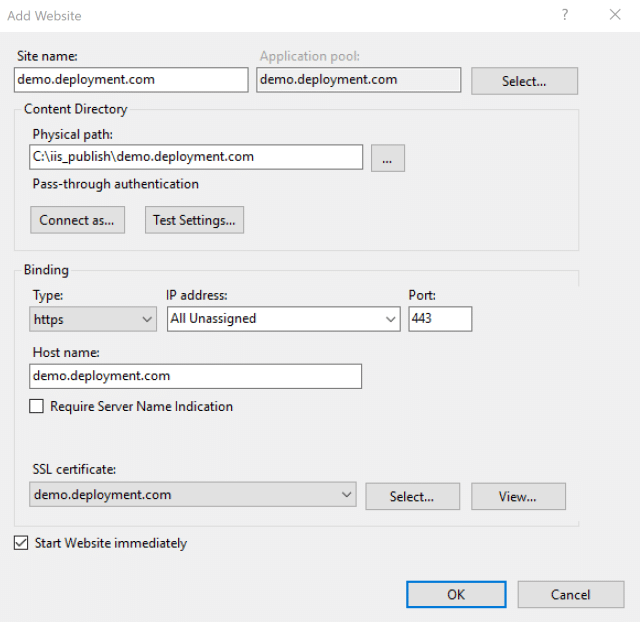
Now create the website in the IIS manager with the HTTPS set.
Here’s an example of a IIS website settings using HTTPS:
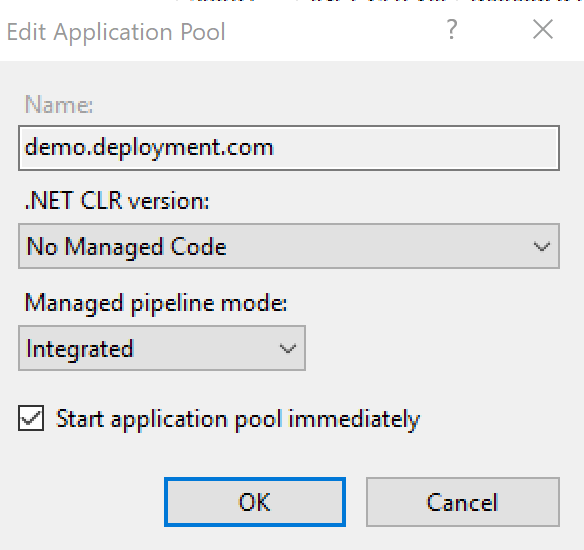
Set the application pool correctly for the ASP.NET Core application:
Configure the HTTPS server hosts file. The hosts file can be found at:
C:\Windows\System32\drivers\etc
Open a notepad editor as an administrator and configure the hosts files.
Add the website mapping:
127.0.0.1 demo.deployment.com
127.0.0.1 stsdemo.deployment.com
Add Logging to the application
You must add logging to the applications before deployment, otherwise you will have no chance of figuring out why the application does not run.
Add the packages to the csproj file:
<Project Sdk="Microsoft.NET.Sdk.Web">
  <PropertyGroup>
    <TargetFramework>netcoreapp2.1</TargetFramework>
  </PropertyGroup>
  <ItemGroup>
    <PackageReference Include="Microsoft.AspNetCore.App" Version="2.1.4" />
    <PackageReference Include="Serilog.AspNetCore" Version="2.1.1" />
    <PackageReference Include="Serilog.Sinks.RollingFile" Version="3.3.0" />

    ...
Add the logging to the program.cs
public class Program
{
    public static int Main(string[] args)
    {
        Log.Logger = new LoggerConfiguration()
       .MinimumLevel.Debug()
       .MinimumLevel.Override("Microsoft", LogEventLevel.Information)
       .Enrich.FromLogContext()
       .WriteTo.RollingFile("logs/log-{Date}.txt")
       .CreateLogger();

        try
        {
            Log.Information("Starting web host");
            BuildWebHost(args).Run();
            return 0;
        }
        catch (Exception ex)
        {
            Log.Fatal(ex, "Host terminated unexpectedly");
            return 1;
        }
        finally
        {
            Log.CloseAndFlush();
        }

    }

    public static IWebHost BuildWebHost(string[] args) =>
          WebHost.CreateDefaultBuilder(args)
          .UseStartup<Startup>()
              .UseSerilog() // <-- Add this line
              .Build();

}
Remove the logging configuration from the startup.cs
Configure the Database
If the IIS hosted application does not connect to the database due to a failed login, this needs to be configured.
Here’s the logs, if this goes wrong:
2018-09-21 11:07:23.003 +02:00 [Error] An unhandled exception has occurred while executing the request.
System.Data.SqlClient.SqlException (0x80131904): Cannot open database "STSDemoDeploymentProd" requested by the login. The login failed.
Login failed for user 'XXXXXXX'.
   at System.Data.SqlClient.SqlInternalConnectionTds..ctor(DbConnectionPoolIdentity identity, SqlConnectionString connectionOptions, SqlCredential credential, Object providerInfo, String newPassword, SecureString newSecurePassword, Boolean redirectedUserInstance, SqlConnectionString userConnectionOptions, SessionData reconnectSessionData, Boolean applyTransientFaultHandling)
   at System.Data.SqlClient.SqlConnectionFactory.CreateConnection(DbConnectionOptions options, DbConnectionPoolKey poolKey, Object poolGroupProviderInfo, DbConnectionPool pool, DbConnection owningConnection, DbConnectionOptions userOptions)
   at System.Data.ProviderBase.DbConnectionFactory.CreatePooledConnection(DbConnectionPool pool, DbConnection owningObject, DbConnectionOptions options, DbConnectionPoolKey poolKey, DbConnectionOptions userOptions)
   at
To connect to the database, the login used in the Application Pool of the website, needs to be included in the logins of the database.
Change the user in the application pool or get the configured, and add or configure this in the database server to allow a database login.
Configure the Deployed Applications to work with self signed Certs
When using a self signed certificate, the demo application login will fail, because the certificate cannot be used to validate.
The following logs shows this:
2018-09-21 10:55:39.513 +02:00 [Error] An unhandled exception has occurred while executing the request.
System.InvalidOperationException: IDX20803: Unable to obtain configuration from: 'https://stsdemo.deployment.com/.well-known/openid-configuration'. ---> System.IO.IOException: IDX20804: Unable to retrieve document from: 'https://stsdemo.deployment.com/.well-known/openid-configuration'. ---> System.Net.Http.HttpRequestException: The SSL connection could not be established, see inner exception. ---> System.Security.Authentication.AuthenticationException: The remote certificate is invalid according to the validation procedure.
   at System.Net.Security.SslState.StartSendAuthResetSignal(ProtocolToken message, AsyncProtocolRequest asyncRequest, ExceptionDispatchInfo exception)
   at System.Net.Security.SslState.CheckCompletionBeforeNextReceive(ProtocolToken message, AsyncProtocolRequest asyncRequest)
   at System.Net.Security.SslState.StartSendBlob(Byte[] incoming, Int32 count, AsyncProtocolRequest asyncRequest)
   at System.Net.Security.SslState.ProcessReceivedBlob(Byte[] buffer, Int32 count, AsyncProtocolRequest asyncRequest)
   at System.Net.Security.SslState.StartReadFrame(Byte[] buffer, Int32 readBytes, AsyncProtocolRequest asyncRequest)
To fix this, you need to add this to the OpenID Connect client configuration, and add the BackchannelHttpHandler definition:
.AddOpenIdConnect(options =>

{

    options.SignInScheme = "Cookies";

    options.SignOutScheme = "OpenIdConnect";

    options.Authority = "your_authority";

    ...

    options.TokenValidationParameters = new TokenValidationParameters

    {

        NameClaimType = "name"

    };

    options.BackchannelHttpHandler = new HttpClientHandler()

    {

        // CAUTION USING THIS !!!

        ServerCertificateCustomValidationCallback =

            HttpClientHandler.DangerousAcceptAnyServerCertificateValidator

    };

});
Set the environment of the target system
The application settings need to be deployed, set to match the deployment target. There is a number of ways of doing this, for example you could use variables in the app.settings, which well be replaced in the VSTS build. Or you could use different app.settings files, which are then used for the different targets.
Important
When setting the ASPNETCORE_ENVIRONMENT, you need to set this for the machine and not just the user.
Open a cmd as an administrator:
setx ASPNETCORE_ENVIRONMENT Development /MThe APP_POOL also needs to use the User profile:
Answer Text from Stack Overflow:
As said in this similar question, the trick was simply to set the app pool to load the user variables (IIS -> Server -> App Pools -> Right click on pool -> Set application pool defaults… -> Load User Profile = True).
I configured only one of my app pools accordingly, thus only one of the sites could access the environment variables.
Summary
Once everything is working, now you should automatic the whole process and use a CI for this.
Looking for .NET Core and .NET Framework hosting provider?
You should really consider finding an option that offers both features and transparent pricing. I personally recommend ASPHostPortal. ASPHostPortal has extremely affordable plans starting at $3.81 per month. The price covers everything from 5 GB of local storage for fast performance to a free SSL certification for customer trust to 24/7, 365 support to answer any questions you have about your website. Choosing the affordable web hosting by ASPHostPortal is a much better option for your business than risking everything for free hosting because you will always know what you are getting for the price.