
Common practices, pain points, and things to note when building a headless WordPress website.
If you have never heard of WordPress before, then I’m sure you’ve been living under a rock for quite a long time. WordPress is by far the most popular content management system (CMS) in the world. Content writers like the fact that it gets out of the way to let you focus on your writing. Developers like its extensibility and freedom for what you want to do with it.
With new front-end technologies on the rise, traditional CMS software can be restricting. Plugins often add a lot of cruft, and you’re limited by what the theming system and your plugins can give you. This is why “headless CMS” has become all the craze lately.
Unlike a traditional monolithic CMS, a headless CMS separates the presentation logic from itself. The CMS acts solely as a dashboard for managing content, served through REST API.
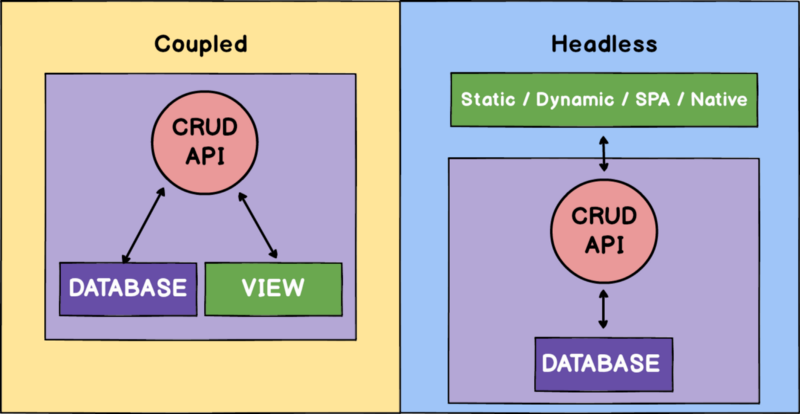
This provides a breakthrough for developers and content writers alike. Content writers can stick to the familiar WordPress interface. Developers can use its API to serve content on any device that they want.
The architecture
At the front of our blog is a modern web app built using Next.js. It’s a minimalistic framework for server-rendered React apps, made by the good folks at ZEIT.
The Next.js website pulls all content from a headless WordPress instance. The flexibility of WordPress allows it to be both monolithic and headless. In a headless architecture, WordPress uses the built-in REST API that any clients can use to fetch content from.
The entire setup is based on this starter kit for headless WordPress built by Postlight. It’s batteries-included, with themes, plugins, and even a fully-working Next.js frontend to kickstart your website. It also includes neat tools to automate most of our workflow and focus on our code.
Theme setup
“Now hold on,” you may ask, “If our WordPress is headless, then why would we need a theme?”
First of all, we will need to register some functions into our WordPress setup. One of which redirects every request to the REST API endpoint, since we’re not using WordPress to render our page.
And secondly, we need a custom REST API endpoint to fetch a post by its slug, since we’ll pass that from the frontend as an argument. WordPress has a special API to set up custom REST API routes in our theme. To learn more about these APIs, check out this guide.
Now try opening your WordPress site in the browser. You should be able to see that everything is now redirected to the REST API.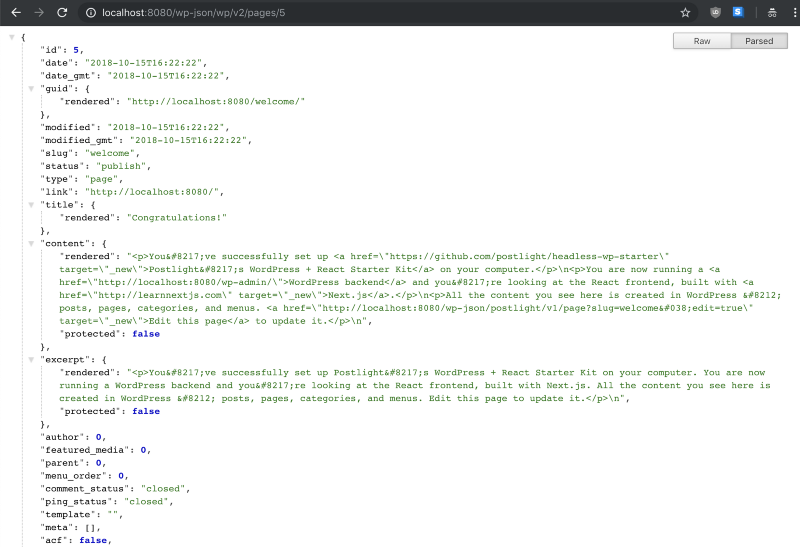
The plugins
WordPress has a next-generation editing experience called Gutenberg already in the pipeline. If you want to try it now, it’s available as an opt-in feature by installing a plugin. However, Gutenberg is still in its infancy. Some features that we need, like exposing blocks onto the API, are still a work-in-progress.
So for the purposes of our blog, I’m putting it aside. That doesn’t mean I haven’t been giving Gutenberg a try, though. I have forked Postlight’s starter and converted it to use Gutenberg.
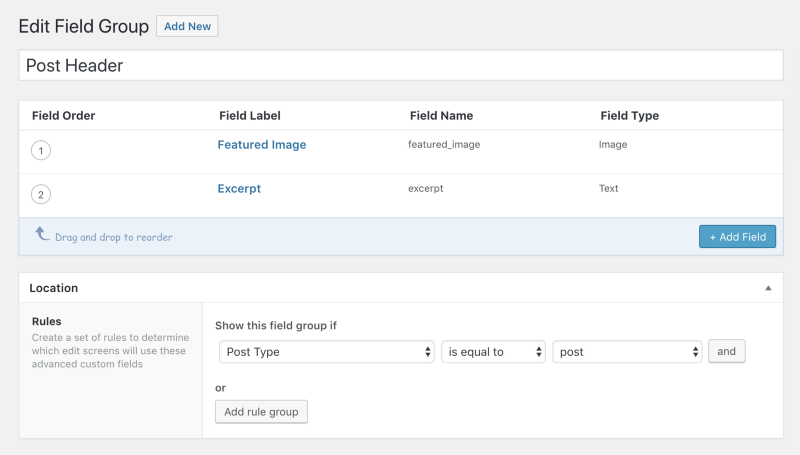
The closest thing to Gutenberg that is readily available is Advanced Custom Fields. We use this to manage custom fields to add to our posts. For example, adding an extra field for post excerpts, as well as featured images in posts.
To be able to use ACF fields and custom menus in our frontend, we need to expose them in our REST API.
For ACF, we use the ACF to WP-API plugin. It requires no setup at all, and puts the custom fields in your post API response under the _acf key.
For our menus, wp-rest-api-v2-menus allows us to expose menus as WP-API endpoints. Thanks to this, we can make customisable site menus for our frontend. To access this menu from the REST API, we’ll have to register some nav menu locations. Put the following in your theme’s functions.php:
<?php

// Add Header Menus
function register_menus() {
	register_nav_menu( 'header-menu', __( 'Header Menu', 'postlight-headless-wp' ) );
}

add_action( 'after_setup_theme', 'register_menus' );
To access this menu, call the API generated by the plugin, adding the menu’s slug. For example: /wp-json/menus/v1/menus/header-menu.
The frontend
At Kata.ai, we are huge fans of React. In the JavaScript world, it already needs no further introduction. There are many reasons why it’s one of the most popular JavaScript frameworks in the world. Especially for single-page apps.
But content-heavy sites like blogs rely on SEO, so server-side rendering is still the way to go. Some popular solutions for server-side rendering include Razzle and Next.js, but Next.js stood out from the rest.
Next.js provides a clean, minimalistic API to get started quickly. By default, it provides the next command line, which runs a preconfigured web server. But you can also set up a custom server with your own request handlers and routing schemes if you want to. Next.js exposes server-side APIs that allows us to do that.
const express = require('express');
const next = require('next');

const port = parseInt(process.env.PORT, 10) || 3000;
const dev = process.env.NODE_ENV !== 'production';
const app = next({ dev });
const handle = app.getRequestHandler();

app
  .prepare()
  .then(() => {
    const server = express();

    // ...Express server handlers

    // Fallback handler
    server.get('*', (req, res) => {
      return handle(req, res);
    });

    // Listen on the default port (3000)
    server.listen(port, err => {
      if (err) throw err;
      console.log(`> Ready on http://localhost:${port}`);
    });
  })
  .catch(err => {
    console.error(err.stack);
    process.exit(1);
  });
In this example, we use Express to do these things:
- Create request handlers for some custom route paths
- Create a fallback route to forward all requests outside of the defined route to Next.js
- Start our server listener.
And that’s how you set up a custom Next.js server. Pretty cool, right? You can even swap Express withany other server library you want, like koa or hapi.
Fetching content + getInitialProps
In Next.js, each page has its own file inside the /pages directory. By default, it’ll be served relative to its path on the web server. For example, to create a page for posts we create post.jsx and page.jsx file inside the pages/directory. When we start the Next.js server, we can access them from /postand /page, respectively.
By default Next.js uses query parameters to pass data to the page. But since we’ve set up a custom server handler for our Next.js app, we can override it to use route parameters.
WordPress has two built-in post types, post, and page. On our frontend server, we’ll add the routes for them just before our fallback handler. We create a route which accepts a slug parameter for both of them. This in return server-renders the page that you specified when you visit that route.
server.get('/post/:slug', (req, res) => {
  const queryParams = { slug: req.params.slug, apiRoute: 'post' };
  app.render(req, res, '/post', queryParams);
});

server.get('/page/:slug', (req, res) => {
  const queryParams = { slug: req.params.slug, apiRoute: 'page' };
  app.render(req, res, '/post', queryParams);
});

server.get('/category/:slug', (req, res) => {
  const queryParams = { slug: req.params.slug };
  app.render(req, res, '/category', queryParams);
});
In this piece of code, the render() function takes your request and response object, along with the actual page relative to the pages/ directory, as well as some query parameters.
Then inside the component, we let getInitialProps() do all the hard work. You can use this to fetch anything you’d like from an API and prerender them in your page, it’s that simple.
import * as React from 'react';
import fetch from 'isomorphic-unfetch';
import Error from './_error';

class PostPage extends React.Component {
  static async getInitialProps(ctx) {
    const { slug, apiRoute } = ctx.query;

    const post = await fetch(
      `${wpUrl}/wp-json/postlight/v1/${apiRoute}?slug=${slug}&_embed`
    ).then(res => res.json());

    if (!post.id) {
      return { error: post };
    }

    return { post };
  }

  render() {
    const { post } = this.props;

    // Return the error page if post isn't found
    if (!post && error) return <Error statusCode={404} />;

    return <Layout>{/* Render your post here */}</Layout>;
  }
}
Handling search
Implementing WordPress search on our Next.js frontend is straightforward. We can now use Next.js’ default routing scheme, which is based on query parameters.
For example, say we have a search bar component like this:
class SearchBar extends React.Component {
  // ...

  handleSearchSubmit = e => {
    e.preventDefault();
    e.stopPropagation(); // just to be sure
  }

  render() {
    return (
      <form onSubmit={this.handleSearchSubmit}>
        <FormRow>
          <input
            placeholder="Search all posts..."
            ref={input => (this.search = input)}
            onChange={this.handleInputChange}
          />
        </FormRow>
      </form>
    );
  }
}
When the form is submitted, we can simply use next/router to redirect users to the search page and we pass the query to getInitialProps().
   handleSearchSubmit = e => {
     e.preventDefault();
     e.stopPropagation(); // just to be sure
+
+    Router.push(`/search?q=${this.state.searchQuery}`);
   };
What about post previews?
One of the problems with headless WordPress is that by default, WordPress generates its own preview page. And we don’t want that.
Interestingly enough, we can create a custom “Preview” button link in our theme, using the preview_post_link filter. We need to set it up in our WordPress theme’s functions.php. This will change our preview URL to the one defined in this filter.
<?php

/**
 * Customize the preview button in the WordPress admin to point to the headless client.
 *
 * @param  str $link The WordPress preview link.
 * @return str The headless WordPress preview link.
 */
function set_headless_preview_link( $link ) {
	if (WP_DEBUG === true) {
		return 'http://localhost:3000/'
			. '_preview/'
			. get_the_ID() . '/'
			. wp_create_nonce( 'wp_rest' );
	} else {
		return 'https://<your_production_url>/'
			. '_preview/'
			. get_the_ID() . '/'
			. wp_create_nonce( 'wp_rest' );
	}
}

add_filter( 'preview_post_link', 'set_headless_preview_link' );
Here, change the link to a /_preview path which will collect the ID of the previewed post, as well as a wpnonce. This is required for authentication purposes. It’ll also set your preview domain based on whether you have WP_DEBUG enabled or not.
Then in our Next.js server we do the same as everything else, register the route and fetch the post in the page. But instead of using getInitialProps(), we use the standard componentDidMount() lifecycle. We need to use this because wpnonce authentication relies on browser cookies.
server.get('/_preview/:id/:wpnonce', (req, res) => {
  const queryParams = { id: req.params.id, wpnonce: req.params.wpnonce };
  app.render(req, res, '/preview', queryParams);
});
import * as React from 'react';
import { withRouter } from 'next/router'
import fetch from 'isomorphic-unfetch';
import Error from './_error';

// Gutenberg block library styles
import blockStyles from '@wordpress/block-library/build-style/style.css';

class PreviewPage extends React.Component {
  constructor(props) {
    super(props);
    this.state = {
      post: undefined
    };
  }

  componentDidMount() {
    const { id, wpnonce } = this.props.router.query;
    fetch(
      `${wpUrl}/wp-json/postlight/v1/post/preview?id=${id}&_wpnonce=${wpnonce}`,
      { credentials: 'include' } // required for cookie nonce auth
    )
      .then(res => res.json())
      .then(res => {
        // check if cookie auth failed
        if (res.code || res.code === 'rest_cookie_invalid_nonce') {
          this.setState({
            error: res
          });
        } else {
          this.setState({
            post: res
          });
        }
      });
  }

  render() {
    const { error, post } = this.state

    // render error page if preview can't be loaded
    if (error) {
      return <Error statusCode={error.data.status || 404} />;
    }

    return (
      <Layout>
        <h1>{post ? post.title.rendered : ''}</h1>
        <div
          dangerouslySetInnerHTML={{
            __html: post ? post.content.rendered : ''
          }}
        />
        <style global jsx>
          {blockStyles}
        </style>
      </Layout>
    );
  }
}

export default withRouter(PreviewPage);
So when we click the “Preview” button on the WordPress editor, it now redirects to the Next.js app.

What’s next?
If this kind of stuff tickles your fancy, you should give headless WordPress a try. If you’d like to take it further, you could also make use of up-and-coming WordPress features like Gutenberg. Or try modern tools for querying API like GraphQL, thanks to the wp-graphql plugin.
Headless CMS is a new paradigm in web development, but its applications are limitless. In the API-driven world of modern web, it takes content management to a new era. With a headless CMS, you can publish your content and use its API to fetch content on any platform you can dream of. Whether it’s your static website, mobile app, or even your chatbot.
And finally, despite its age, WordPress still remains a very flexible CMS. Headless CMS with WordPress is worth trying out, and the benefits that we get outweighed the risks and pain points we encountered.