
ASP.NET Core configuration providers read configuration data from common sources such as JSON files and databases. But you can use other sources by creating custom configuration providers.
We use configuration providers in ASP.NET Core to load configuration data into our application from one or more configuration sources. These providers can read configuration data from command line arguments, environment variables, JSON or XML files, databases, Azure Key Vault, and other sources—including your own custom sources.
The ASP.NET Core configuration system comprises a set of classes that make it easier to manage the configuration settings of your application. This system is lightweight and extensible, and it provides a consistent way to store and retrieve configuration settings for all ASP.NET Core applications.
For custom configuration sources, you can create your own custom configuration provider in ASP.NET Core and attach it to the configuration system. A custom configuration provider can help you to reduce the complexity involved in loading configuration metadata from custom configuration sources or external sources.
This article presents a discussion on how we can create a custom configuration provider in ASP.NET Core 6. To work with the code examples provided in this article, you should have Visual Studio 2022 installed in your system.
Create an ASP.NET Core 6 Web API project in Visual Studio 2022
First off, let’s create an ASP.NET Core project in Visual Studio 2022. Following these steps will create a new ASP.NET Core 6 Web API project in Visual Studio 2022:
- Launch the Visual Studio 2022 IDE.
- Click on “Create new project.”
- In the “Create new project” window, select “ASP.NET Core Web API” from the list of templates displayed.
- Click Next.
- In the “Configure your new project” window, specify the name and location for the new project.
- Optionally check the “Place solution and project in the same directory” check box, depending on your preferences.
- Click Next.
- In the “Additional Information” window shown next, select .NET 6.0 as the target framework from the drop-down list at the top. Leave the “Authentication Type” set to “None” (default).
- Ensure that the check boxes “Enable Docker,” “Configure for HTTPS,” and “Enable Open API Support” are unchecked as we won’t be using any of those features here.
- Click Create.
We’ll use this ASP.NET Core 6 Web API project to create a custom configuration provider in the subsequent sections of this article.
Creating configuration providers in ASP.NET Core 6
A configuration provider is typically a C# class that can retrieve configuration data from a source (a file, a database, an external API, etc.) and make it available to the application. There are many built-in configuration providers in ASP.NET Core including JSON, XML, and database providers. However, you can also create your custom configuration provider if you need to.
To create a custom configuration provider, you must create a class that extends the ConfigurationProvider class. Then, you need to override the Load() method to load the configuration data from wherever it is stored and return the data as a key-value dictionary.
Once you have created your custom configuration provider, you can register it with ASP.NET Core by adding it to the services collection in the Program.cs file.
IDG
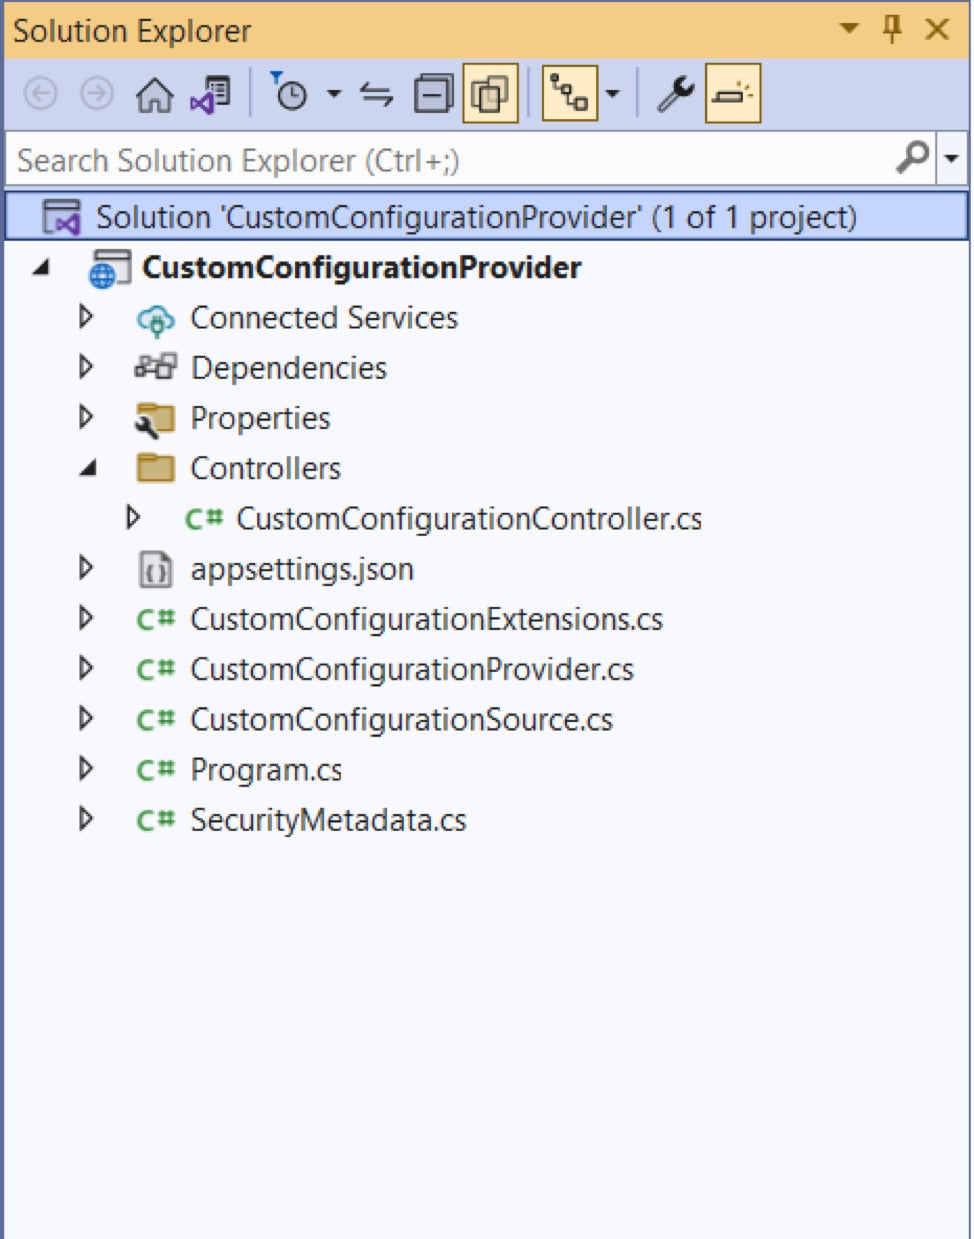
Let’s now get started building a custom configuration provider in ASP.NET 6 Core. The final solution will comprise the following files:
- SecurityMetadata.cs
- CustomConfigurationSource.cs
- CustomConfigurationProvider.cs
- CustomConfigurationExtensions.cs
- CustomConfigurationController.cs
We’ll learn about each of these files in the sections that follow. In addition, we will also write code in the Program.cs file to add the configuration provider and configuration source to the default configuration system of the ASP.NET Core runtime. The Solution Explorer window of the completed application should appear as shown in Figure 1 above.
Create a class for security metadata in ASP.NET Core 6
We’ll store API keys and API secrets in a .json file and read it in the application we’ll be building here. We’ll not be using any of these keys for authenticating or authorizing requests in this example.
API keys and API secrets are both used to authenticate access to an API. The main difference is that API keys are public and can be accessed by anyone, whereas API secrets are private and should never be shared. An API key is an identifier that allows you to interact with an API in a secure way.
API keys are used to restrict who can use an application and what they can do with it; i.e., they are used to authenticate and authorize requests. API secrets are used to store sensitive information in your app. You can also use API secrets to generate checksums and to encrypt and decrypt data.
Create a class named SecurityMetadata in a file having the same name with a .cs extension and enter the following code.
   public class SecurityMetadata
    {
        public string ApiKey { get; set; }
        public string ApiSecret { get; set; }
    }
Create a class for a configuration source in ASP.NET Core 6
Next, we’ll create a configuration source to initialize our custom configuration provider. To do this, create a new .cs file named CustomConfigurationSource and give it the following code.
    public class CustomConfigurationSource : IConfigurationSource
    {
        public IConfigurationProvider Build(IConfigurationBuilder builder)
        {
            return new CustomConfigurationProvider();
        }
    }
Your custom configuration source must implement the IConfigurationSource interface. The IConfigurationSource interface contains the Build method where you should invoke your custom configuration provider.
Create a custom configuration provider in ASP.NET Core 6
To read configuration information from an external data source, you must implement your custom configuration provider. Your custom configuration provider is a normal C# class that extends the Microsoft.Extensions.Configuration.ConfigurationProvider abstract class and overrides the Load() method as shown in the code listing given below.
    public class CustomConfigurationProvider :
    Microsoft.Extensions.Configuration.ConfigurationProvider
    {
        public override void Load()
        {
            var text = File.ReadAllText(@"D:\SecurityMetadata.json");
            var options = new JsonSerializerOptions
            { PropertyNamingPolicy = JsonNamingPolicy.CamelCase };
            var content = JsonSerializer.Deserialize<SecurityMetadata>
           (text, options);
            if (content != null)
            {
                Data = new Dictionary<string, string>
                {
                    {"ApiKey", content.ApiKey},
                    {"ApiSecret", content.ApiSecret}
                };
            }
        }
    }
Note how the ApiKey and ApiSecret are being stored in the dictionary instance named Data.
Create a custom configuration extensions class in ASP.NET Core 6
We’ll now create an extension method that will create an instance of the CustomConfigurationSource class and return it.
    public static class CustomConfigurationExtensions
    {
        public static IConfigurationBuilder AddSecurityConfiguration
        (this IConfigurationBuilder builder)
        {
            return builder.Add(new CustomConfigurationSource());
        }
    }
Add the custom configuration source to Program.cs in ASP.NET Core 6
Now, enter the following line of code in the Program.cs file to add the custom configuration source to the collection of configuration providers.
builder.Configuration.AddSecurityConfiguration();
The complete code listing of the Program.cs file is given below for your reference.
using CustomConfigurationProvider;
var builder = WebApplication.CreateBuilder(args);
// Add services to the container.
builder.Configuration.AddSecurityConfiguration();
builder.Services.AddControllers();
builder.Services.AddEndpointsApiExplorer();
builder.Services.AddSwaggerGen();
var app = builder.Build();
// Configure the HTTP request pipeline.
if (app.Environment.IsDevelopment())
{
    app.UseSwagger();
    app.UseSwaggerUI();
}
app.UseAuthorization();
app.MapControllers();
app.Run();
Create a custom configuration controller in ASP.NET Core 6
Lastly, create a new API controller named CustomConfigurationController and replace the default generated code with the following code listing.
    [Route("api/[controller]")]
    [ApiController]
    public class CustomConfigurationController : ControllerBase
    {
        private readonly IConfiguration _configuration;
        public CustomConfigurationController(IConfiguration configuration)
        {
            _configuration = configuration;
        }
        [HttpGet]
        public IActionResult Get()
        {
            var metadata = new SecurityMetadata
            {
                ApiKey = _configuration["ApiKey"],
                ApiSecret = _configuration["ApiSecret"]
            };
            return Ok(metadata);
        }
    }
Note how the IConfiguration instance is injected in the constructor of the CustomConfigurationController class.
If you now run the application and hit the HttpGet endpoint of the CustomConfigurationController, you should see the configuration data being returned after it is read from the .json file in the file system. To check this, set a breakpoint in the HttpGet action method of the CustomConfigurationController as shown in Figure 2 below.
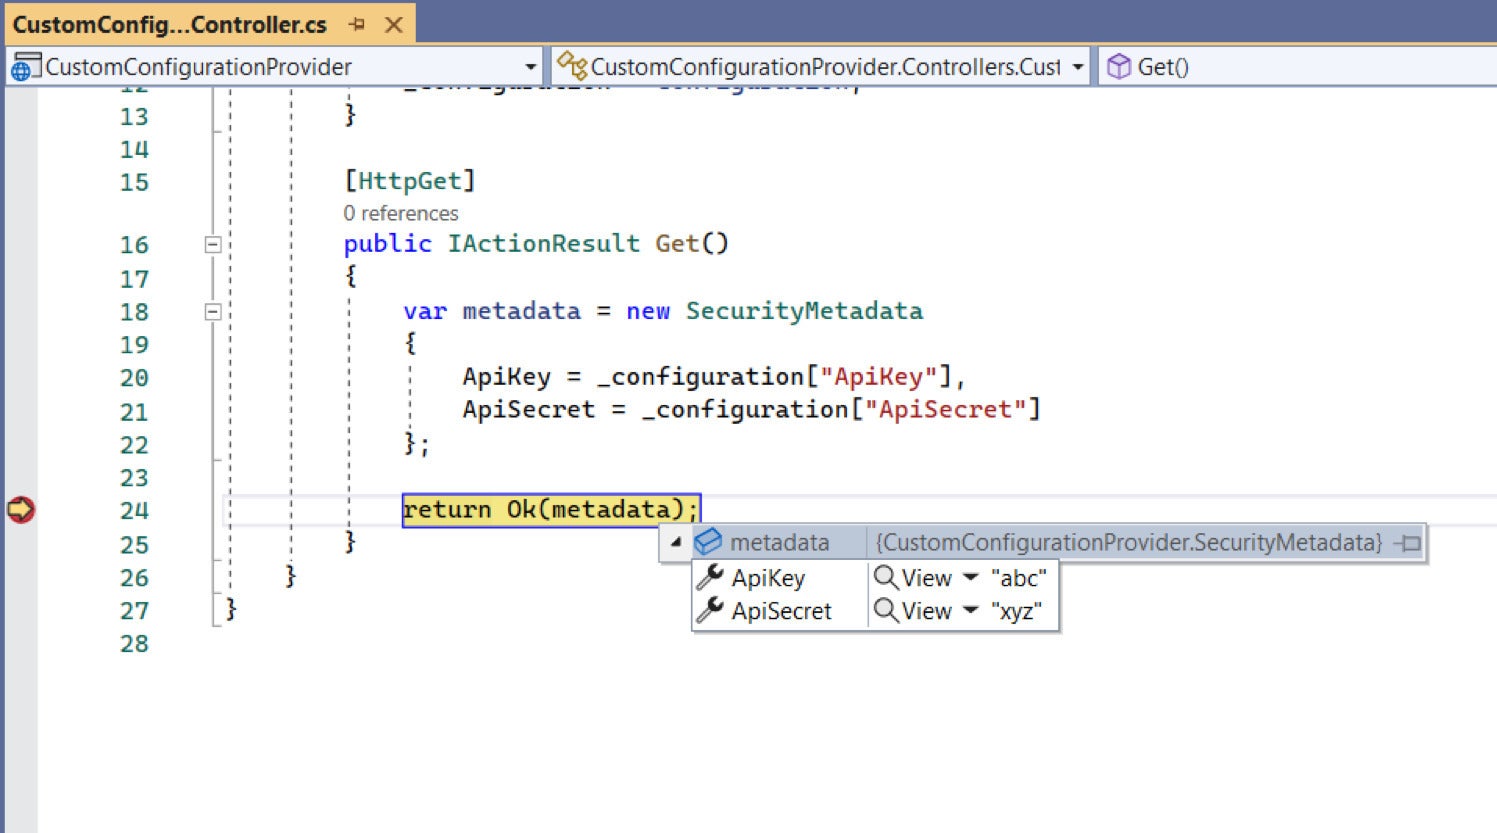
IDG Figure 2. The ApiKey and ApiSecret are returned from the HttpGet action method.