
Sometimes a bad or incorrectly configured WordPress plugin could be the reason that your WordPress is not loading or working as it should. We all rely on plugins to make our website user friendly, offer more functionality or get the marketing tools necessary to power our business. Not all WordPress plugins work as expected then updated, so you need to be sure how to disable WordPress plugins from cPanel and to easily diagnose the problem with your website not loading. Here is a quick and easy tutorial how to disable your plugins from cPanel. This guide is useful for both beginners and expert users as it takes a minute to locate the faulty plugin that is messing up your WordPress website.
First, we must determine if the problem we are experiencing is caused by one of the plugins we are using. The fastest way to do this is to follow these steps:
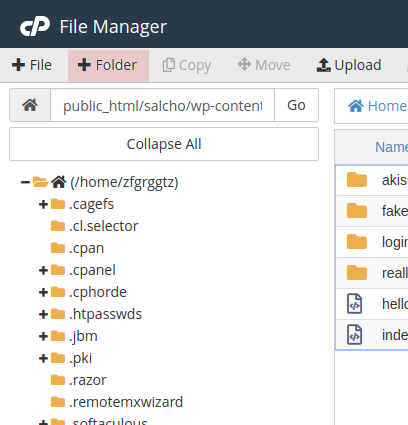
- Login to your cPanel and go to File Manager
- Navigate to your WordPress installation folder. Example – Public_html/MyWordpress

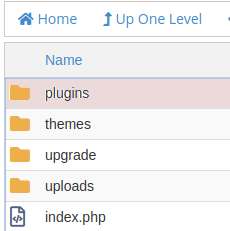
Locate your plugin folder that is located in here: Public_html/MyWordpress/wp-content/plugins
There you will find all the plugins that you have installed in your WordPress

Now rename the plugins folder to something like “ pluginsDisabled ”
To rename the folder – Right click on the folder -> Rename
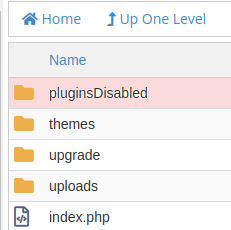
Now all the plugins you have installed in your WordPress are disabled. Try to reload your website in Incognito mode on your browser to check if the problem you have experienced is now gone. If it is gone, you will have to find out which of the plugins caused the problem.
In order to do so, first, you have to rename the “ pluginsDisabled “ folder, back to its original name – “ plugins ”
Now open the “ plugins “ folder and there you will see all the plugins that you have installed.
Create a new folder by clicking the + Folder sign on the top left
Name the folder “ disabled “ or something similar and click create a folder.
Now you have to remove all the plugins folders, one by one, in the folder that you have just created. This can be done by drag-and-drop or by right-clicking -> Move function.
It is important to move the folders one by one and to reload your website after every removal. This way you will find which of the plugins was causing you the problems with your WordPress website.
Disable WordPress plugins manually in cPanel
Alternatively, you can disable the plugins you have installed in your WordPress one by one. Simply rename the folder in which your plugin is located by adding _disable or _1 after its name. By doing to you can easily find which is the faulty plugin that is causing your website to stop working and to find a way to fix it – by either updating it, setting it back to a previous version that worked or simply deleting this plugin and using an alternative one. All this can be done in your cPanel that is the default management panel for your hosting account and your website`s files. Even if you are a beginner, this tool is a handy helper that that ease your life and you can disable WordPress plugins from cPanel in a matter of minutes.