
Do you get the “WordPress updating failed” error message while updating your site? Failures when updating and publishing in WordPress can be very annoying. That’s why we have put together this guide that will show you how to address the possible reasons and methods to fix the WordPress update failed error.
WordPress has auto-update features that make the update process easier. If you enable auto-updates, your site will automatically install all the new releases, e.g., 5.7.1 to 5.7.2, in the background. For any major updates, you get a notification that asks you to update WordPress and within a few clicks, you can update your site to the latest version.
As you probably know, keeping your site up to date is really important. Each new release contains crucial bug fixes, optimizations, and new features. However, sometimes the update fails and you get the WordPress update failed error. In that case, you will be stuck with the current version and will miss out on the latest features.
Now let’s have a look at how to fix the WordPress update failed error.
Identifying the cause of the WordPress Update Failed Error
To fix the failed updating problem, you have to identify the root cause of the failure first. Depending on the failure reason, you can apply different fixes.
If you have a look at the WordPress update failed error message, it states the possible cause. For example, let’s say your current WordPress version is 5.7.1, and you want to update to 5.7.2, but the update fails. The error message you get will be something like this:
Downloading update from http://wordpress.org/wordpress-5.7.2.zip...
Unpacking the update...
Verifying the unpacked files...
Installing the latest version...
Could not copy the file.: /httpdocs/wordpress/wp-admin/js/list table.dev.js
Installation Failed
If you check line 5, it states that WordPress is unable to copy the mentioned file. Similarly, you may receive an error message that contains the possible reason for your update failure.
How to fix the WordPress Update Failed Error
Several reasons can cause the WordPress update failed error. In this section, we’ll have a look at different solutions:
- Delete the .maintenance file
- File permissions
- Turn off safe mode
- Add FTP details to the wp-config file
- Update WordPress manually
Let’s have a look at each of these solutions that can help you solve the WordPress updating failed issue.
1. Delete the .maintenance file
Usually, after a failed WordPress update you get locked out of your site. This means that you will no longer have access to your WP Admin Dashboard or any page of your website. The end-user visiting your site will see a message that says “Briefly unavailable for scheduled maintenance. Check back in a minute.”
This happens because during the update process WordPress puts the site in maintenance mode. Now since the update failed, it remains in maintenance mode. This info is stored in the .maintenance file (remember that the file name starts with a “dot”) in your WordPress directory.
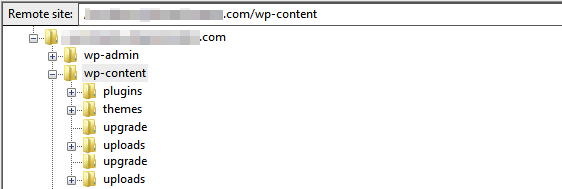
To solve this issue, all you need to do is find your way to your site’s root directory and delete the .maintenance file. For this, you need FTP access to the root directory of your WordPress site, which you can get via the server’s control panel or by using an FTP Client like FileZilla.
Once you have removed the .maintenance file, you will get access to your website again. You can then login and check the error message that caused the update to fail.
2. File Permissions
Another reason that may cause the WordPress update failed error is when the server is unable to create a temporary file that is required during the update in the /upgrade/ directory. To create the temporary file, the server needs permission to write to that directory.
To solve this issue, you need to route again to the WordPress root directory. In the root directory, locate the /upgrade/ directory and give write permissions to it. You can either give it the required 755 (CHMOD) permissions or go with full 777 permissions for a short time.
Once you have given the directory proper file permissions, you can attempt to update your site again. If the auto-update still fails, delete the /upgrade/ directory, re-create it, and give it the required permissions. After that, initiate the update again and it should work.
Keep in mind that if you give the /upgrade/ directory full 777 permissions, you should change it back to strict 755 permissions after the update. Allowing full 777 permissions to the server isn’t a recommended practice, so you should keep them as short as possible.
3. Turn Off Safe Mode
Turning off safe mode might help you with the WordPress update failed issue. However, safe mode is deprecated as of PHP version 5.3.0, and removed in version 5.4, as per the PHP manual. The manual states:
This feature has been DEPRECATED as of PHP 5.3.0 and REMOVED as of PHP 5.4.0.
If you are working with an older version of PHP, you might want to turn off the safe mode as it may resolve some issues that are hindering the update. You can turn off the safe mode via the server’s control panel or editing the php.ini file via an FTP client. Simply open the php.ini file in an editor and change the line
safe_mode = on
to
safe_mode=off
Afterward, restart Apache and log in to your site. You should be able to update WordPress without any issues.
4. Add FTP details to the wp-config file
Sometimes the update may fail in WordPress because your FTP credentials aren’t updated. This might happen because your site has been moved recently, or you have updated things like passwords, permissions, and so on.
In such cases, you can provide WordPress with the updated credentials manually by editing the wp-config file.
First, make sure you have the correct FTP credentials with you. Then, make your way to the wp-config file through the cPanel or an FTP client.
Open the wp-config file with a text editor like Notepad and paste the following lines to the file just above the line that says, “/* That’s all, stop editing! Happy blogging. */”.
define(‘FS_METHOD’, ‘ftpext’);
define(‘FTP_HOST’, ‘ftp.website.com’);
define(‘FTP_USER’, ‘username’);
define(‘FTP_PASS’, ‘password’);
NOTE: You need to replace the FTP_HOST, FTP_USER, and FTP_PASS with your website, username, and password respectively.
Finally, try again and you should be able to update WordPress.
5. Manually Update WordPress
Are you still getting the WordPress update failed error even after trying all the above methods? In that case, a manual update might be your best bet.
Though it is a bit technical, it isn’t as complex as it may seem. WordPress has put up a detailed guide on how to manually update it for those who don’t know how to proceed. If you follow all the instructions correctly, you will have no problems updating your site.
It’s worth noting that you won’t have to apply all future updates manually like this. Once you finish with this update, all future updates will be applied automatically, as they should.
By following the methods explained above, you will be able to fix the WordPress update failed error.
However, that’s not the only common issue that you may experience.